Friday, August 26, 2011

A modern interior with the interior work begins

!9# A modern interior with the interior work begins

[if ]
[endif]

The most important aspect of a modern interior has a smooth surface on the walls and ceiling. This can be achieved in different ways. If you are remodeling an existing home can be difficult depending on the existing finish. If there is a heavy texture, then it is time to settle. It may also 4-6 layers of dried mud on the walls and ceiling. One of the techniques they use is spraying the mud with my equipment to spray with my knife, and removableFlattening of the mud. I super-heavy spray and let sit a little 'and before using any tool. If you do not have to spray a plant, you can always spray hopper recommended but this is the hard work will mainly cover.

If the new building will have a smooth surface is easier for your modern furniture to achieve. It starts with the wording that you want to be sure that all lead and hang your pot before drywall. I always check everything before with a straight edge 8 'to ensureThere are twisted studs and joists are all flat. If a stallion stands and replaces it, and if he hides it from below, so it is flush with the rest. This will save you long term! No matter how good your author, the wood will shrink and twist, and there's nothing to do would be to avoid this. THIS important for any new building. IF YOUR ceilings are over 12 'wide, you need the joists CONNECT WITH 1 "X 4". I mean by largeperpendicular to the beams. Nail the 1 "x 4" on top of the bar to keep them all together so that they all move as one. If not, I guarantee that the cracks in the ceiling! This is not a code, but it is necessary to avoid cracking, if you want the ceiling. Now that we have a flat-proof structure, you can hang the drywall.

To achieve this a smooth surface for your modern decor in the new building, I recommend 5 / 8 "drywall hung on everything. And 'more rigidand lays flat to 1 / 2 "drywall and has a perimeter less. Use to delete more and 12 'drywall joints. Every good wish to use drywall hanger 12" drywall. If you hang (not recommended), select Pay attention to your windows and doors horn. So I do not mean to break a common law in a corner of a window or door, this will cause cracks. You can not rail joints. By this I mean, if a room over 12 'long and then put your first sheet from one end and yourcoming from the other, so that the buttocks are added. Still hanging from the ceiling, then your walls. if your paper hanging walls are hung up first. I know this is drywall 101, but it bears repeating. Once the drywall is hung the time to start taping and finishing.

Now comes the easy part (not!). I would recommend that if you do not know how to tape drywall NOT! It 'easy to mess up once and it's so hard to fix messed up! You said, here are some tipsreaching for that modern decor. First cut any drywall bad as residual items and so on. Then pre-fill all the gaps in the warm mud. I prefer the mud five minutes, but 20 minutes is due. After using the tape, sheath, so that basically fill the niche of the factory. Empty the first thing you want to try. Sometimes you can fill a cavity and create a hump. Not good! In the lining of the joints add 1 1 / 2 "roofing nails and nails may head to head with the tape drawing inside of the circle.So that the butt joint is easier to float and make it easier dish. I use a 18 "in diameter, if butt joints or float him also as a guide. I take the knife and hold vertically on the wall or ceiling and move it here and to see if there is a day or oscillates between the blade and the wall . If this is an area that must be filled. I use this method in each municipality and all the bull nose corner beads or metal. The human eye can not see everything, and this methodensuring it is flat. Once everything is flat it's time to clean it tight. By this I mean, you take thin mud and put it on and take it all alone to fill the cavity. I put everything in both directions, with the municipality and the municipality. This ensures that the work comes out completely smooth. I thin all over, all nails and metal corner joints with the criss-cross method, takes the guess work out of work! As regards the correction goes, I do not care much, I try to keep a minimum.My theory is that if you grind Put a thin layer it needs. If I use a sanding sponge, I would sand and sand. You can be 100 times more than you can see. There are products that you can buy with an airless units, a level that is five to get ready to be sprayed. After spraying it will require a light sanding. Another possibility is to use me all over the coat and make sure everything is flat and then spray the sludge on real heavy knockdown and spread with a knife, then scoopsmooth. You may have a light texture, like the old plaster houses, or make it completely smooth. After drying, a thin layer of cavities. I have a kitchen like this, and he painted the first to check it out, with gloss paint and it was absolutely perfect. I also color stucco added to the slurry and eliminates painting. He needs a sealant, but it's a great show! I hope this helps you to create a perfect finish and the flat, smooth, modern interiorrequires.

This article was written by David Kilburn


A modern interior with the interior work begins

Bodum Santos Coffee Maker Sale Off

Friday, August 19, 2011

3 / 8" Radius Profile Wheel MK-275 Size: 6"

!9# 3 / 8" Radius Profile Wheel MK-275 Size: 6"


Rate : | Price : $196.10 | Post Date : Aug 19, 2011 22:45:28
Usually ships in 3-4 business days

151694 Size: 6" Features: -3/8'' Radius Profile Wheel MK-275. -Electroplated profile wheels for marble. -Provide clean, professional contours for marble and granite. -Require no special saw modification and mount to most tile saws quickly and easily. Specifications: -Item # 151694 - Diameter: 6'', Weight: 1.96 lbs. -Item # 154025 - Diameter: 8'', Weight: 4 lbs. -Item # 152022 - Diameter: 10'', Weight: 5 lbs. -Arbor: 5/8''. -Radius: 3/8''.

Last Minute Roland V Drum Lite Simmons Beautyrest Eurotop Free Shipping Catalog Ipaq 4150

Wednesday, August 10, 2011

Do It Yourself Granite Plans - The Top 3 Considerations

!9# Do It Yourself Granite Plans - The Top 3 Considerations

[if ]
[endif]

There are over a hundred or more people want things on their own. Some say that if you want results, do it yourself. Changes house is now easy to give a simple construction of local stores of DIY renovations at home, to take as granite.

Stores offering DIY granite are numerous manuals and tips on how to install their products.

Top 3 things to keep in front of theInstallation of granite:

Template When you install a granite shelf, make sure the right model for you to get the right size for your granite tile. Do it yourself granite should be easy, provided you comply with the rigorous and precise size for your card to install. Countertop edges There are various granite shelf edges, you can choose. o A special finish is round shaped and rounded edges of the granite every corner of the formYour work surface. A square or enamel is almost similar, only Bullnose, has a square edge. bars or edge connector and an elegant finish, that attaches to the side and ends of the granite, the projects can be simple or elaborate. Countertop Layout The layout of the bar to define the appearance and durability once installed. Consider the following: Grout or: Are there any standard for applications Malta granite tile installation. However, do it yourself graniteDepending on the ceiling can be classified application. coating or: The base must be smooth and clean in order to obtain a comprehensive work plan and level. or hand-held sanding and polishing the edges will help the plan work.

To check whether the surface is flat work surface, make a quarter or a flat surface, if you notice any irregularities, you may need to readjust.


Do It Yourself Granite Plans - The Top 3 Considerations

Low Price Philips Respironics Cpap

Friday, August 5, 2011

Hardin 38WVPOLSET 3/8-Inch Radius Stone and Concrete 1/4 Round Bullnose Shaping and Wet Polishing Kit

!9# Hardin 38WVPOLSET 3/8-Inch Radius Stone and Concrete 1/4 Round Bullnose Shaping and Wet Polishing Kit


Rate : | Price : | Post Date : Aug 06, 2011 03:52:50
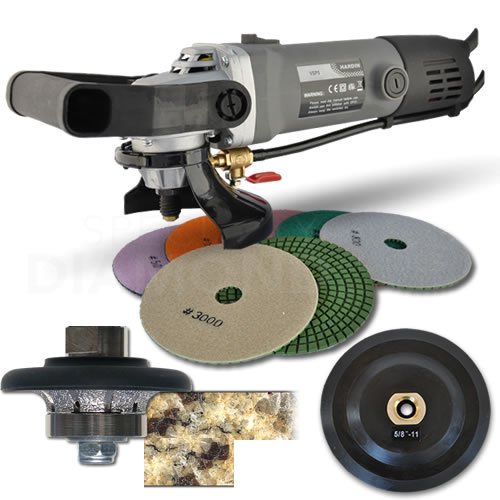
Usually ships in 1-2 business days

The stone workers need for quality tools has led to the evolution of the Hardin product line. The composition and characteristics of marble, granite, tile, and engineered stone differ dramatically from concrete. Achieve professional results when profiling and polishing stone counter tops and surfaces with the Hardin Variable Speed wet polisher. Ergonomically designed with a water delivery system that sits under the polisher. Simply hook the end of the 5 foot 1/4" water line to a standard 5/8" garden hose as a water source. Lightweight enough at about 6.5 pounds with enough power to get the job done. This unit is equipped with a 950 watt, 8.29 amp, variable speed motor. Adjustable via a variable speed wheel switch located at the back of the polisher. You can operate from 2,000-4,000 RPM. When polishing, you get optimum results around 2,500 RPM. This kit is ideal, at higher RPM, to shape the edge of a slab of granite, marble, tile, or masonry with the included vacuum brazed profile wheel. The profile wheel is simple to use. Works much like a router bit works. Has a flat surface that rides on top of the material being worked on. On the bottom of the vacuum brazed profile wheel, you have a guide bearing that rides up against the side of the material. Keeps the bit 100% true. Put the 1/2 round metal splash guard around the collar of the polisher. Then with nothing else on the arbor simply thread the vacuum brazed profile wheel onto the 5/8"X11 UNC thread arbor. Set polisher to the higher RPM setting, turn water on low, power up the grinder, apply some force parallel with the working surface, & you're on your way to profiling your custom edge. This Hardin Variable Speed Polishing kit comes with a set of 8 premium diamond polishing pads. Start polishing with the 50 grit pad & continue polishing with each successive grit until you achieve that factory shine. The final pad in the kit is the 10,000 grit buff pad. This is the pad that will give you that mirror like finish.

New Nautica Bed Linens


Sponsor Links